![]()
![]()
![]()
![]()
![]()
![]()
![]()
![]()
Quick menu - click on the above images
|
|
|
Creating
eBooks with PowerPoint Using common presentation tools like Microsoft’s PowerPoint or other presentation tools teachers and students can easily create their own talking electronic books. These books can be “played” on a computer or printed out and bound. Another classroom application of the PowerPoint eBook is to use technology to create digital “Big Books” for class reading and other activities. Obtaining printed teacher big books and their associated student small books can be an expensive prospect and there are limited titles available. But by using a video projector or large screen television connected to an online computer, a teacher can connect to one of the picture books online and then display the book to the whole class to use as an instructional reading activity, or to use the book as example of writing, culture, or art. These digital big books would not by themselves cost anything extra, and they have the added advantage of being able to be placed onto a disc and made available at the students’ home for outside reading. The easiest way to start creating your presentation eBook is to create a folder to store all your files in and then create a template to use for your eBook. A PowerPoint eBook template is available that you can use to get started on your PowerPoint eBook. The reason to use a template (whether you download it or create your own), is to save you time later, this way you won’t have to repeatedly add items like page turners to you book pages. And the folder is to have all the necessary files in a common location so you don’t have to look for them, for example when you burn your book to a CD you will also need to make sure that any sound or video files are transferred also. If you don’t have PowerPoint try downloading and using OpenOffice’s presentation tool. OpenOffice is a free productivity suite of tools and is available from http://www.openoffice.org/ .
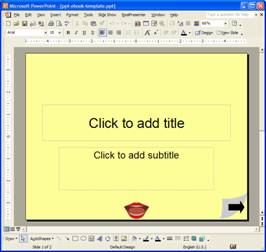
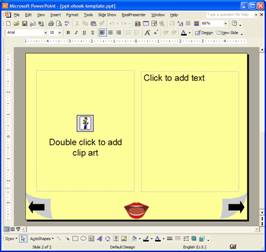
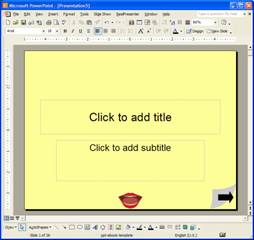
The Template. Whether you are creating your own eBook template or downloading one it should have some common elements of layout and control. You will most likely need at least two page layout templates, one for the start of the eBook and another for the contents. And you will need page turning buttons, and if you are creating talking eBooks then you will also need a speech button which will act as a placeholder for right now. The page turning buttons should be set for an “Action Setting” of going to the next or previous slide. You should also now set your background color. Choose one that is either a white or a light pastel. Some pastel colors like light yellow have actually been found to improve readability for many people.
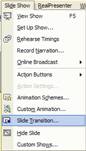
You should also now set the page transitions now. If you are going to have an action page change then one which moves the text to the left has a better reading design. Select Slide Transition from the Slide Show menu. Then choose from the list of transitions one that changes the pages in a way that is pleasing and doesn’t interfere with reading or become distracting, not too fast or loud. Once you have selected which transition you want to use, click on the Apply to all Slides button.
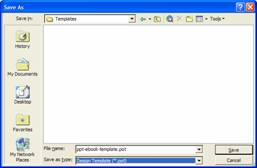
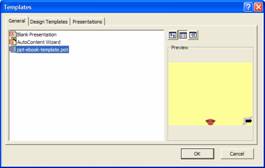
Once you have your template the way you want it save it as a Design Template (.pot) type with the name of your choice in the Templates folder. This way the next time you want to create a PowerPoint eBook or have your students create one the base template will be one of your design choices.
Creating the eBook. To start your new eBook in PowerPoint select File, then New. Now from the New Presentation menu choose the General Templates button and then from the General tab choose your eBook design. You are now ready to start writing your book.
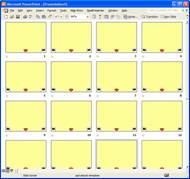
To start you book you will need a number of blank pages, you will also need to create a story board for you book too. The easy way to do this is to change to the Slide Sorter display from the View menu and then copy the blank page and paste as many pages in as you need. To copy the blank page click on it once then choose Copy from the Edit menu. Next select paste from the Edit menu as many times as it takes to make as many pages as you feel you will need. If you don’t know how many pages you will need, create about 25 pages to work from. A quick way to add the blank pages is to press the control and V keys at the same time to paste or control and D to duplicate.
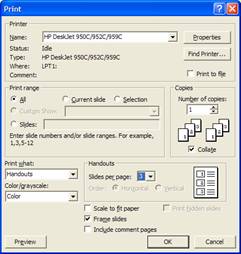
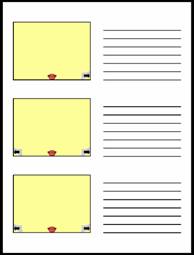
Storyboard. A good idea now is to print out a “Notes” version of your blank book to use as a storyboard to work on for your book. Select Print from the File menu. From the pop-up window change the “Print what” dropdown to Handouts and in the Handouts options change the “Slides per page:” dropdown to 3, this way you get the blank lines for noting or story writing. Now press the OK button and print out your storyboard handouts and get started writing your story.
As you write your story just make rough sketches of what you want on your pages and you either find or create the final pictures later.
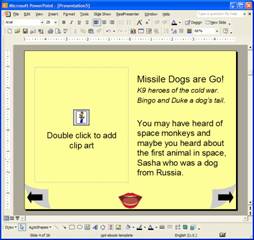
Writing. Adding text to your eBook is not much different from using a regular word processor. On each page there should be a text box with the statement “Click to add text” so you do just that. Click in the box and write your story. If you need to you can reposition the text boxes or add a new text box using the drawing tools or from the Insert menu.
When you add your text the program may automatically resize some of it to fit within the text box. If you want you can leave it this way or resize it yourself using either the adjust text size tools on the tool bar or formatting the font size (Format – Font). Depending on your audience you will have to judge how much text to have on a page.
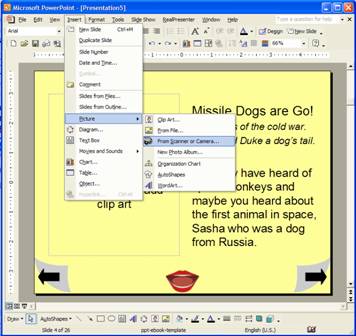
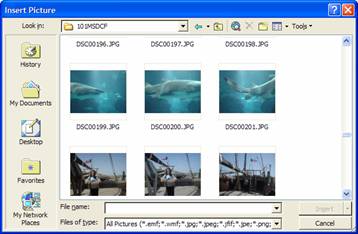
Images. Now it’s time to add some pictures to your eBook. Pictures can come from a wide variety of sources, such as digital cameras, scanned drawings, computer drawing programs, and even from online sources of clipart and photographs. You can even mix the sources up a bit, like using an image from the internet, but then manipulating that image with software to remove parts, change parts or turn it into a different kind of picture. With some image programs you can take a photograph image and turn it into a charcoal drawing. Scanning. If you like to draw or are having different student in class create images for different pages using paint, colored pencils, or crayons then scanning is a great way to get the pictures into the eBook. Place the picture you want onto the scanner and then select the Insert menu, choose the Picture option, and then the From Scanner or Camera… option. A pop-up window will give you your scanning options, choose your scanner, click OK, and now a scanner window should appear. All scanner programs should have both a Scan and a Preview option. Click the Preview option to make sure that the picture is correct, right side up, and lined up straight. There is also a resolution setting that you might want to change, often the default is at 300 dpi (dots per inch) which is fine for printing, but computer screens usually display at 75 dpi, so you should decrease the resolution, this will also reduce the file size. Now click the Scan button, your image should be scanned and then the picture placed into your eBook. Digital Camera. Another great option is to use a digital camera and take your own photographs to be placed in your eBook. Use your digital camera or have the student use it to take picture of artwork, live situation, or anything that you want to include and then insert the pictures you want into your eBook. To insert the pictures you use a similar process as with scanning, but first connect your digital camera to your computer. Select the Insert menu, then Picture, and then From Scanner or Camera…, this time select the digital camera from the options. A window should show you the camera contents. Many new digital cameras connect to the computer through a USB port and the computer doesn’t see them as cameras, but instead as drives. In this case instead of choosing the from camera option you choose the From File… and browse to the camera’s memory. Once you find the picture that you want, click once on it and press the Insert button.
Internet. You can get pictures from a variety of locations on the internet also. For example using the Google search engine you can search for pictures on any subject, and then save them to your hard drive to be inserted into your book. There are also a number of sites that provide copyright free clipart and photographs online. Make sure that you are allowed to use any picture that you find on the web. Once you have saved the image to the hard drive you just use the Insert menu, click the Picture option, and then chose the From File… choice. Browse to the picture and click Insert. Drawing Program. If you like to draw with a computer you can use this method also to create your pictures. Make your picture with a program like MS Paint and then save your picture file to the book folder. Then just insert your picture using the Insert – Picture – From File options. You can also use the drawing tools in PowerPoint to make pictures also, but it is a bit limited concerning tools and options. Once the picture is on the page you can resize it by clicking once on the picture and then clicking and dragging on the corner marks. You can also use the picture tool bar to adjust a picture’s color, contrast, brightness, crop, rotate, etc.
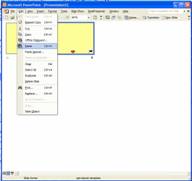
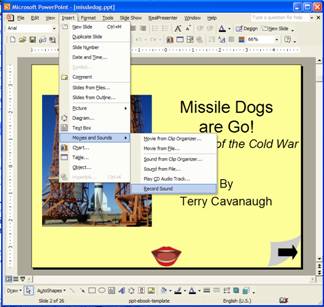
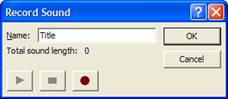
Speech. With just a microphone plugged into your sound card you can now add speech to your eBook. Before we go any further we need to make sure that PowerPoint will embed the sound files and save them with the book file. To make sure that the sounds are saved, click on the Tools menu and choose Options. Now choose the General tab and change the “Link sounds with files size greater than” to 50,000 Kb, which is the highest it will go, and then click the OK button. To add speech to a page of your eBook, go to that page and then choose the from the Insert menu the Movies and Sounds option, and then choose the Record Sound. A pop-up window will appear that you can use to record your voice reading your book. Click on the red circle to start recording and click on the square to stop. Click on the button with the triangle to playback your recording. Change the name of the Record Sound file to what page it is in the book and then click the OK button. A speaker symbol will now appear on the eBook page.
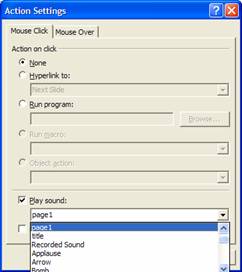
To associate the sound with the mouth symbol you will need to change the mouth’s action settings. Click once on the mouth to select it. Then from the Slide Show menu, choose Action Settings. In the Action Settings pop-up window put a check in the Play sound; box and then select the sound you created from the drop down list. Once you have done that you can delete the speaker symbol from the page, and instead play the sound file by clicking on the mouth.
That’s it. Once you go through the rest of your book adding images and sound you are done, you have created your own PowerPoint eBook. I know that the instructions seem a bit long, but it is really not hard, and by the time you have done a few slides you’ll be amazed at how easy it seems. |
Send mail to
cavanaugh@drscavanaugh.org with
questions or comments about this web site.
|