Panorama Dioramas - a DIGITAL CAMERA Project
An application of using digital cameras and modeling.
Dr. Terence Cavanaugh
University of North Florida
Modeling is a basic part of many classes: science, math, social studies, and art. Students need to make, display, and discuss models. With this activity, teachers and students have an additional option for modeling that incorporates technology. MS Encarta Encyclopedia online defines a diorama as being either a display case or a miniature replica of scene. Students usually create dioramas to be models, which provide an interpretation, example, or simplified version that the students use as a three-dimensional focus for a report or project. Classically, in schools, students create the diorama using a variety of household items, usually a shoebox, then adding a design or collage into the background, and placing other objects within the diorama to create its 3-D model effect.
Many content area standards can be met through the use of diorama modeling, including geography, mathematics, science, social studies, and art. For example the national geography standard about “the world in spatial terms,” in which students use geographic representations to process and report information, could be accomplished through the use of a diorama, while at the same time meeting the national technology standard specifying that students use technology tools to publish and interact with peers, experts and other audiences.
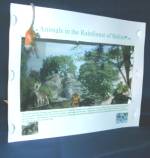
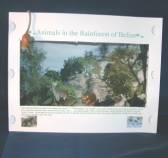
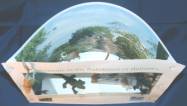
In this activity, students create a 3-D model diorama using a panoramic image as the background. The front of the diorama is made of card stock that may include information such as the title, a description or other details about the project. The use of the panorama as a background adds realism to the diorama and it improves the student’s technological skill.
To complete this Panorama Diorama project you will need the following:
Materials
- 8½ x 14-card stock
- 8½ x 11-card stock
- Scissors
- Tape
- Printer (color is better)
- Digital panorama image
- Ideally students should use a digital camera that takes panoramas and they should create their own digital panoramas.
- Appropriate materials to sit within the diorama
Other options
- Transparences that work with the printer
- Small round magnets
- Plastic straws
If you don’t have all of these, try experimenting with other materials.
With this format design a digital photograph panorama becomes the background for the diorama. Panorama photographs can be found on the web or made with a digital camera. The panorama will be printed out and that sheet will become the background of the diorama. For extra effects an overhead sheet can be printed to become part of the foreground of the diorama.
I have placed online some of the panoramas that I have created that could be used to make the diorama background. Open the panorama page.
Use your mouse to rotate the object above.Procedure
- Using a word-processing program, change the page settings to landscape format and a paper size of 8½ x 14 inches
- Insert the digital panorama picture onto the blank document. You may need to resize or crop out some of the panorama to make it fit. Leave at least a 1 inch (3 cm) margin on all sides. You could make a deeper diorama by putting the panorama on two sheets, with half of the panorama on each sheet. This method may be used if you don’t have any 8½ x 14 inch cardstock.
- With your 8½ x 14 inch cardstock in the printer, print out the panorama. This sheet will become the background for the diorama.
- Return to the word processor and make a new blank page. Change the page settings so that the paper size is 8½ x 11 inches and the format is landscape orientation.
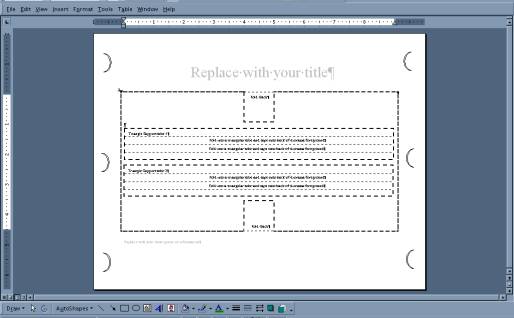
MS Word template is available for the foreground:
- Change the page settings to change the page margins to 1.5 inches (4 cm) on all sides.
- Now insert a page border by choosing the Format menu and selecting the Borders and Shading option. There you will find a tab that allows you to add a simple line border onto your page at the margins. You can now add a 1 x 1 inch boxes centered at the top and bottom of the page to act as tabs.
- Edit the header and footer of the page. In the header write the title of the diorama and in the footer write a summary that explains the diorama. You might also add your name and any other pertinent information you need.
- Print this page on 8½ x 11 inch cardstock. This sheet will become the foreground.
- Cut out the middle section of the foreground sheet by cutting along the page borders. Do not cut off the boxes or cut through the sides. Fold the box tabs back
- Using a knife or scissors cut three semicircle curves into the sides of the foreground. The curves should arc toward the center of the page.
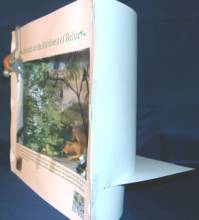
- To make the diorama more stable, tape or glue straws or triangle shaped tubes made from the foreground scraps onto the back of the foreground sheet near the top and bottom of the page.
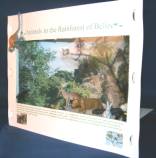
Assembling the Diorama
- Gently push back the curve cuts along one side of the foreground and fit the background side edge into the curves. Place a small piece of tape over the curve to better hold the background in place.
- Do the same with the other sides of the foreground and background.
- Stand up the diorama and place appropriate objects inside.
Extra options
The Stage
At times you might want your diorama to have a specialized floor. This can be easily added with just a few cuts and an extra sheet of 8½ x 11 inch cardstock, cut or folded in half to become 8½ x 5½ inches.
To add a stage or floor to your diorama then you will need to use scissors or a knife to cut a line across the panorama background 1.5 inches from the bottom and at least 2 inches from each side. Now reassemble the diorama and slide in the 8½ x 5½ inches sheet of cardstock through the cut in the background and over the bottom tab of the foreground. Tape the tab onto the stage sheet to hold in place.
You can use the other half of the cardstock to make a ceiling for your diorama. A ceiling can be used to hang objects so that they are suspended in midair inside the diorama. Hang your objects with “invisible” or dark thread that has one end pushed up through the ceiling. Tape the thread onto the ceiling to hold it in place.
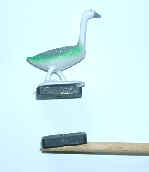
Interactivity
For interactivity, you will need the stage (see above), some thin wooden dowels, small button magnets (2 for each object you want to move), and a glue gun with cool melt glue sticks. You can make the diorama interactive by adding small magnets on the bottom of objects inside your diorama. Using a hole punch or scissors cut some small holes in the bottom of the foreground. Glue small magnets on thin wooden dowels (cool melt glue with glue guns works very well) making sure that the side of the magnet that attracts the other magnet is up. You can now feed the dowels through the holes and then move the rods with the dowels around to make objects in the diorama move.
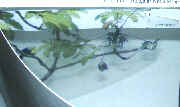
Foreground Images
You can add foreground images to your diorama by printing out the images on an overhead transparency sheet designed for your printer. With a blank page on your word processor, change the page setup to landscape orientation and all the page margins again to 1½ inches. Make sure that your objects are far enough from the edges so that the foreground frame will not block them. Insert the images that you want on the page and then print on the overhead sheet. Glue or tape the overhead sheet onto the back of the foreground. You will need to trim the sides of the overhead sheet so that it does not block the curved tabs that connect the foreground and background sheets.

©Drs.Cavanaugh 2006